Saturday 23 March 2013

A Welcoming Bench...

"Oh Pinterest, how you taunt me! With all your DIY projects, I suddenly have the desire to have a can of spray paint in my hand!" I had to get off the computer and find a project. But what? I went searching in my Father-in-law's shop for ideas. I found one! Actually two. Two beat up old chairs. I asked if I could have them. I asked where the sand paper was kept. And I went to the hardware store... to buy spray paint!

Here's the chairs before...

I can't imagine these chairs ever being comfortable. The seats had absolutely no padding in them. I unscrewed them from underneath and we saved them for a template for the new seats. And then I began sanding...

I took them back to the shop to spray them. I primed them first, and then waited very impatiently for it to dry. I have never spray painted anything before. I was advised to used lots of thin coats, and let it dry in between. I was supervised by my husband, my father-in-law & and uncle who kept passing by and giving me advice. The only thing they couldn't give me was patience. I gave them a number of thin coats over the course of the weekend. I was anxious to put the seats on. I had what I thought was the perfect fabric. My husband cut new seats. We cut foam and worked together on upholstering them. We put it in the entrance to see the look.

We didn't like it. It made the chairs look washed out. Like they disappeared into the wall. How disappointing! On to Plan B...

Hmmmmm... maybe a bench would be better. And they needed to be distressed. D brought me his electric sander. I was scared to use it. What if it turns out ugly? He reassured me that it doesn't take much to spray paint over it if I don't like it.

So, I sanded. Then I filled in where I sanded with a dark brown stain and a tiny sponge brush. Very carefully. Any stain that would get on the paint was there to stay. While I worked on that, D worked on joining the 2 chairs and making a seat for the bench. I love that we work well as a team. And it helps that he's a carpenter... and he knows what he's doing... because I don't. I am willing to learn though, and that is all that matters.


Distressing added much more personality and made it stand out from the wall. Now, all I needed was a new fabric choice.  It took a week of laying different choices over it, and I finally decided on a pretty yellow upholstery fabric. The funny thing was though, it looked better with the wrong side up. Who says you have to follow the rules?


Now, my bench sits by our front door, welcoming all who enter. It is a place to sit and take your shoes off, or to put them back on when it's time to go. It is a place where someone can sit and visit. It welcomes friends, family and customers. But most of all, when I see it, it makes me happy! I made it!! And I am so proud of taking on a new challenge!

Christmas Ornaments

After seeing so many great ideas on Pinterest, I had decided that for Christmas 2012, we would make homemade, homespun style ornaments for our Christmas tree. We worked on a lot of the ornaments together as a family. Here are some of the projects that we did.

Cinnamon Applesauce Ornaments: I mixed together equal parts of cinnamon powder & applesauce. I used 2 cups of each. We then rolled out the dough and cut it with a star cookie cutter and cut a hole in each with a straw. The boys helped, and we had so much fun laughing together. As you can imagine, with 2 teenage boys playing with brown dough, they had a little fun with inappropriate "piles" of dough on the counter. We all thought that a strategically placed "pile" would be fun to do at school on April Fool's Day. Oh, if only it didn't smell so much like cinnamon...

The stars were then placed on the trays of the dehydrator. We had them in at approximately 120 F and left them in over night. The house smelled so good the next morning!!

 This is what they looked like when they came out of the dehydrator the next morning. They smelled wonderful!

The cinnamon stars needed a bit more personality, so I hot glued wooden buttons from the dollar store, then tied hemp twine and a 1 inch strip of homespun fabric to each of them. I love the look! So cute & country!


Cornstarch & Baking Soda Ornaments: These turned out beautifully! Here's what we did:

Combine 1/2 c. cornstarch
               1 c. baking soda
                3/4 c. water 

Pour all ingredients into a medium saucepan on medium-low heat, stirring consistently. Stir until the mixture starts to thicken and eventually looks like mashed potatoes. 

Remove dough from saucepan and put it in a bowl and cover with a damp towel. Let cool for approximately 30 minutes, until dough is at a comfortable temperature to touch. Knead the dough thoroughly to get out any air bubbles. Roll out dough 1/4" thick.

We used rubber stamps to make impressions in the dough before we cut them. We used snowflake and other winter themed stamps from Stampin' Up! Then, we cut into shapes,. Remember to cut out a hole for hanging using a straw. 


Most instructions we found said to then bake them in a 200 F oven. However, since we have a dehydrator, I thought it might be better to let them dry more slowly at a lower temperature. We set it on 120 F and let it dry for 20-24 hours. I can't compare the results with ornaments baked in the oven, but I was very pleased with the way they came out.


Although I found the ornaments very pretty, I felt like they were lacking personality & pizzazz. So I got out my Stampin' Up! inks and a bag of cotton balls. After rubbing the cotton balls in the ink pad, I rubbed them in circles over the stamped design. We tried different looks such as, rubbing the entire ornament, rubbing the middle & the edges of the stars, and just rubbing the centers where the stamped image was. We liked the last look the best. The more you rub in circles, the darker the ink gets. I would rub the very center the darkest, then get lighter as I moved to the edges. This added so much depth to the ornaments. 

I then tied hemp twine to the ornaments, with a 1" strip of homespun fabric tied around the hemp twine. I love these! We will be using them for years to come.

 This is my favorite!


We also dehydrated orange slices for the tree. Adding hemp twine & homespun fabric for hanging. (I wish I had a photo of the finished ornaments.)


I antiqued and rusted jingle bells using the following instructions found here. I hung them with hemp twine & homespun fabric as well. Rather than ribbon as garland, we used burlap. I bought it in rolls from Michael's. We also hung our wooden ornaments and others that had a country look or held sentimental value to the kids. I loved this tree! It is my favorite tree in years! (We do a different theme each year!) It was beautiful, and we had fun together as a family creating the ornaments!


We also had fun making a display for our front porch. We cut small spruce trees from our yard, placed them in pails filled with sawdust and decorated them. It was very pretty and welcoming.


Merry Christmas & Happy Crafting!

Friday 22 March 2013

Sesame Street Birthday Party

Our daughter turned 2 in January. This was my chance to have a big, girly birthday party! I love planning parties, and have only ever had boys to throw parties for. My plan was to have a tea party, and make it as pink & girly as possible. But K's love for Elmo invaded my plans and took over. I didn't want to just do a typical, primary colored Sesame Street Party though. I wanted it girly. Pink or purple please! Abby Cadabby colors would be perfect!


With my Sister-in-law's help (she knows cakes) some lavender colored marshmallow fondant, and my handy-dandy Cricut, we were able to come up with this masterpiece.


Behind the cake, you can see another one of my pride and joys... the streamer wall. I had seen this idea a few times on Pinterest, but again, wanted to girly it up. I found a large container of silk hydrangea flowers (for wedding decorations or flower baskets) at our local thrift store for $1.50. So, with the help of fishing line, scotch tape and my mom, we began taping flowers to the fishing line. (The OCD in me took over after hanging the wall, and I rolled tape and stuck another flower to the back of each flower... crazy?!? I know! But it was worth it!)  I had to conquer a fear of following and climbed on the top of the dresser that we use as a hutch and taped the strings of flowers and streamers to the ceiling and then to the banister. (Did I mention that the whole time I was afraid of following down the expanse that is the stairs to the basement?) The crazy amount of effort was worth it though, and the streamer wall hung in our house for a month after the party!


The decorations were combinations of ideas from Pinterest with my own flair added, the use of my Cricut and a crazy amount of patience (tiny pieces of paper cut with the Cricut assembled with precision to create the Sesame Street friends.) 

 The cookie tray was made with dollar store plates & wine glasses


 A dollar store fish bowl full of Goldfish Crackers

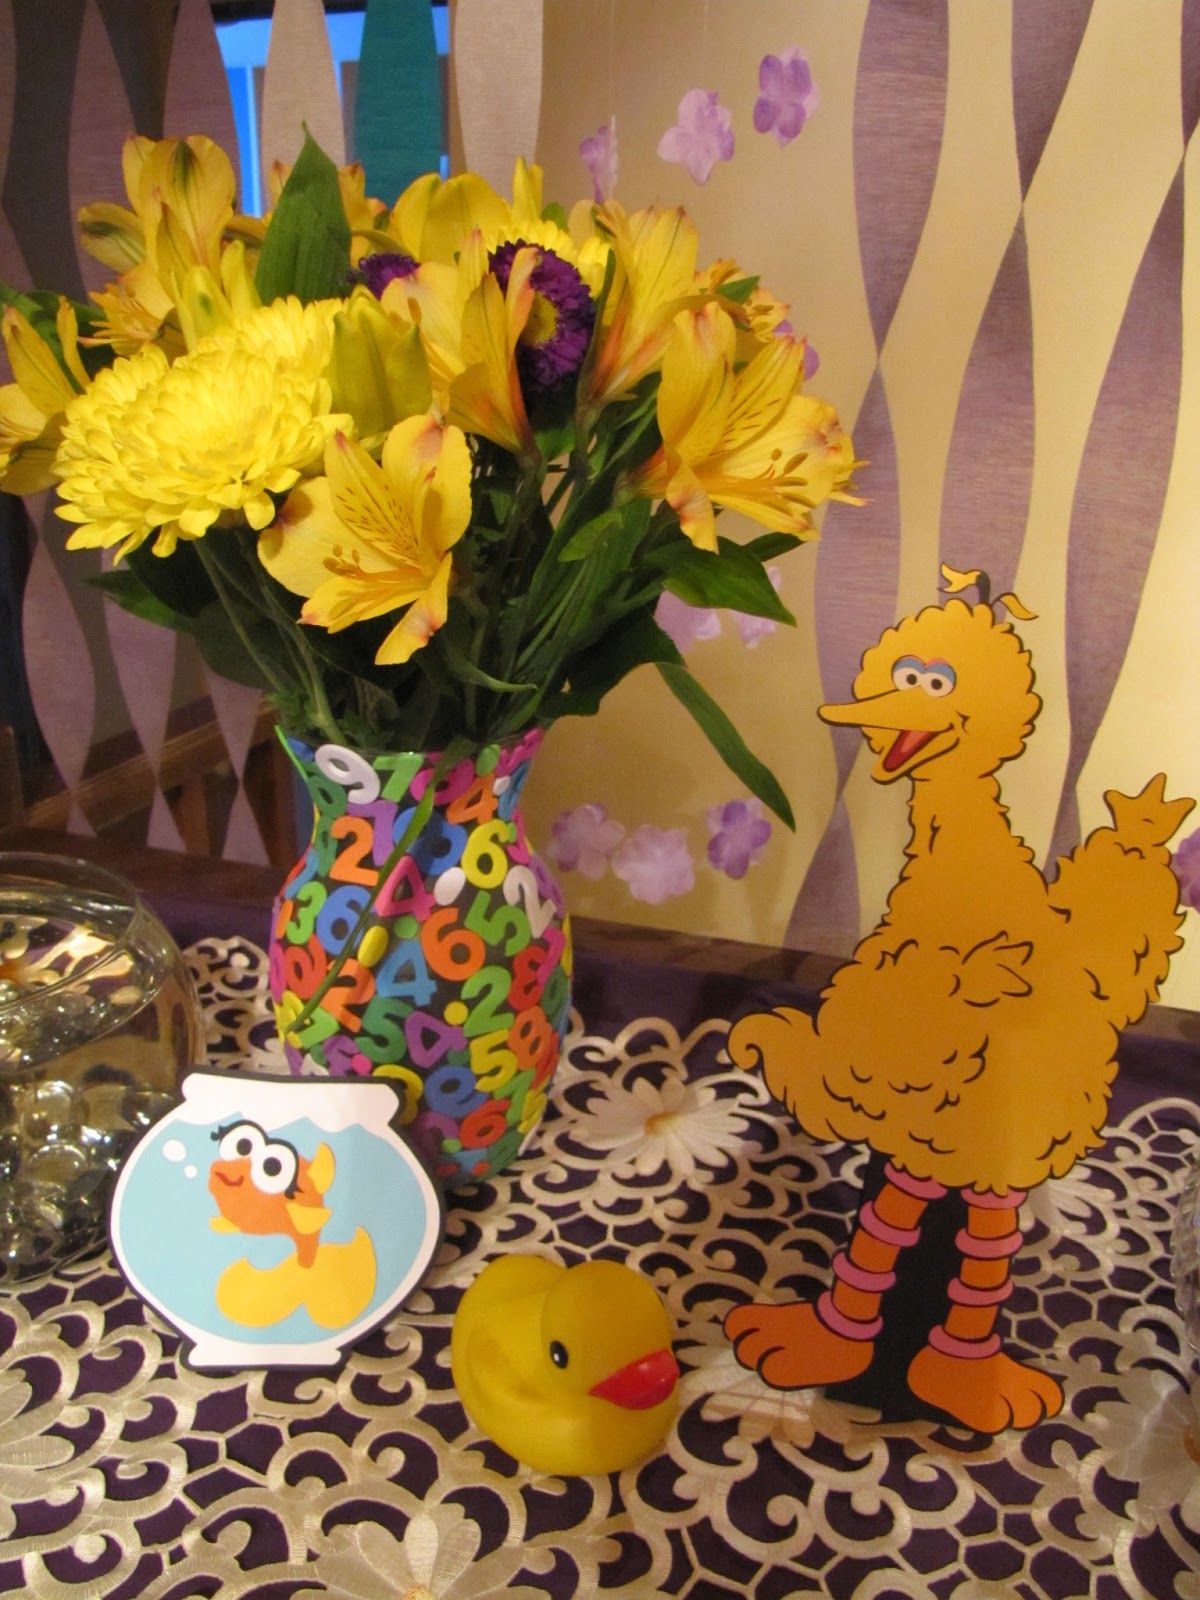
 "Sunny Days. Sweeping the Clouds Away." A dollar store vase with foam numbers glued on holds a beautiful bouquet of sunny, yellow flowers. I had the help of both my 2 year old & my 13 year old with gluing the numbers on. Big Bird welcomed the guests.

Even Dorothy made a guest appearance at the party! The little kids were so excited to see her!!

The balloon characters were the boys' responsibility to make. My 13 & 15 year old boys had so much fun making them! There was much laughter!

We had a few games and a craft for the kids. We decided to have a bit of fun with some of the names of the games and the menu items to give the grown-ups a laugh. "Toss Your Cookies..." consisted of throwing cookie shaped bean bags (sewn with felt and stuffed with rice) into a giant Cookie Monster face that my DH made out of painter's tape on the floor of the store.


Oscar's Trash Toss was simply throwing crumpled up newspaper in a pail. We thought this would be a perfect game for toddlers, but some were compulsive about "cleaning-up" the mess it made. It was funny!


The kids also got to make a Muppet with brown paper bags and sticky felt shapes...


We decided to serve a full meal to our guests. We invited K's friends & their families plus our extended families. I think we had about 25 people here. All the food was planned with Sesame Street in mind and some items had a character label by them.


 Elmo & Oscar Veggie Platters


 Some twisted humor for the adult guests...

 Fairy Rainbow Pops...

Specially made Elmo & Dorothy plates for the kids to eat off of. They didn't seem to notice or care that I ran out of time to make Dorothy a tail. Kids aren't as into details as I am.

The cake was a hit! I used the idea found at Once Upon a Pedestal for the cake, but improvised with cake pops made with frosting and pound cake made from scratch. (I can't eat anything made from cake mix.)  2 layers and a double batch for cake pops equaled 6 batches of cake batter. It was a very heavy cake that took a long time to bake, but was so delicious!!

 Abbey Cadabby was a special gift from Grandma!


 The party was a huge success. I was told it was the "Best theme party ever!" I know that my family thought that I put a crazy amount of work into it. And they should know, they were a big help!! And I know that 2 year old's don't care about details. But all the hard work goes to show just how much I love this little girl and love that she's part of our family & life!! 


Paper Flowers...

I am leading our Sunday School in a year of studying the Bible from a First Century Jewish perspective. The lessons are inspired from Joe Amaral's book, Understanding Jesus. You can read more here: http://www.firstcenturyfoundations.com/understandingjesus.html Very insightful!! I am making the decorations for the Seder to be bright and full of the new life that spring brings. My inspiration came from Pinterest. The instructions are from here. All that I did differently was first cut out what seemed like a million circles using my Creative Memories Custom Cutting System. I then cut the wavy spirals and began rolling and hot gluing.


This arrangement will decorate the girls' room after it gets its makeover. The colors are perfect!


The brightness of the flowers added a lovely feeling to my home. It was a cold, snowy, dreary 3rd day of spring outside. Saskatchewan had just been hit with a major blizzard and everyone was tired of winter. It brought hope that spring was, in fact coming. I made 3 arrangements today that looked like this. I had made one other one during the week for a friend who is sick. I used darker, antique colors on theirs. Colors that they love. 


I also made another arrangement with paper flowers with a totally different look. You can find the instructions on A Blog Called Wanda. They are beautiful! So life-like! I love them!


I plan to wrap burlap around the tops of the mason jars. I just need to go digging through my boxes to find it. I love how these turned out and am excited to make more, but using different styles. After our Passover Seder, I plan to use these to decorate around my home, my health food store and in the girls' room. I also will have them ready to bring to someone if they need a bouquet of get well or encouragement flowers.